
New SOM Rule Book

by
James Furtado and the Strat-O-Matic Mailing List
Get your name added by helping with the project.
|
|
|
|
New SOM Rule Book
by
James Furtado and the Strat-O-Matic Mailing List
|
You have in your possession a baseball game with all the features of major league baseball. Major league ballplayers will perform for you, according to their major league records and your managerial decisions.
All rules of baseball apply. Each manager selects his team and plays 9 men, one for each position, in his starting lineup. In selecting your ballplayers, you may refer to their records at the bottom of each card for helpful advice. To play a position, a player must have that position stated on his card. (Outfielders may play another OUTFIELD position by using the Outfield Conversion Chart.) Once you have selected your starting 9 men, put them into a batting order, one card on top of the other with your first hitter on top and your ninth hitter on the bottom. The remaining players should be set apart from your starting batting order, or lineup, to be used as substitutes.
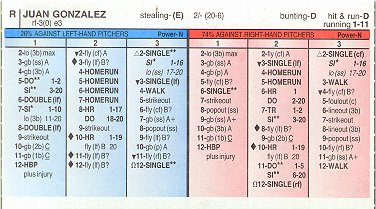
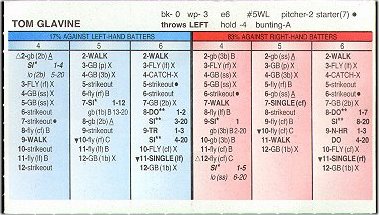
To begin, the team that is up first will put their first batter up. The team in the field will put their starting pitcher face up in the area marked by the pitcher's picture. Set the strategy chart upright behind the playing field. The dice are rolled, and the white die and 20-sided die are read separately from the two colored dice total, The white die and colored dice are rolled on all plays. The 20-sided die is rolled when there are men on base. The white die refers to the proper column number on the player's card. The column numbers are the large numbers directly underneath the player's name, learn and position. Columns 1,2 and 3 are found only on the batter's card, columns 4, 5 and 6 are found only on the pitcher's card. The colored dice refer to the series of numbers (2-12), located underneath the column number. The 20-sided die determines wild pitch and passed balls. Below is an example of a batter's card (Juan Gonzalez) and a pitcher's card (Tom Glavine).
 To
illustrate, let us say that Tom Glavine is pitching to Juan Gonzalez. You
must first determine the hitting style of the batter and the throwing
style of the pitcher. To determine the hitting style of the batter, refer
to the extreme top left-hand corner of the batting card, to the left of
the player's name. An R indicates the hitter bats right, an L indicates
that the hitter bats left and an S indicates the batter is a switch
hitter. To determine the throwing style of the pitcher, refer to the top
of his card. Gonzalez would thus be a switch hitter and Glavine a right
handed pitcher. For a result of 1,2 or 3 on the white dice you would refer
to the left-hand side of Gonzalez's card (You would refer to the
right-hand side if he were facing a right-handed pitcher). For a result of
4, 5 or 6, you would refer to the right-handed side of Glavine's card (If
Glavine was facing a left-handed hitter, you would refer to the left-hand
side of his card), With none on and a white 2 and a colored dice total of
4 is rolled. You would look at Gonzalez's card underneath column 2 to the
number 4. The result would be a homerun. If you had rolled a white 5 and a
colored dice total of 8 , you would look at Glavine's card underneath
column 5 to the number 8. The result would have been a strikeout.
To
illustrate, let us say that Tom Glavine is pitching to Juan Gonzalez. You
must first determine the hitting style of the batter and the throwing
style of the pitcher. To determine the hitting style of the batter, refer
to the extreme top left-hand corner of the batting card, to the left of
the player's name. An R indicates the hitter bats right, an L indicates
that the hitter bats left and an S indicates the batter is a switch
hitter. To determine the throwing style of the pitcher, refer to the top
of his card. Gonzalez would thus be a switch hitter and Glavine a right
handed pitcher. For a result of 1,2 or 3 on the white dice you would refer
to the left-hand side of Gonzalez's card (You would refer to the
right-hand side if he were facing a right-handed pitcher). For a result of
4, 5 or 6, you would refer to the right-handed side of Glavine's card (If
Glavine was facing a left-handed hitter, you would refer to the left-hand
side of his card), With none on and a white 2 and a colored dice total of
4 is rolled. You would look at Gonzalez's card underneath column 2 to the
number 4. The result would be a homerun. If you had rolled a white 5 and a
colored dice total of 8 , you would look at Glavine's card underneath
column 5 to the number 8. The result would have been a strikeout.
As your pitcher must remain aside from the batting order, replace the card in the batting order with the card marked pitcher's hitting card. Do not use the pitcher's card for his turn at bat. Use only the card marked pitcher's hitting card. Be sure that you select the pitcher's hitting card which has the same number found in the right-hand corner of the pitcher's card. For example, a pitcher with a 3 should use the pitcher's hitting card number three. Pitcher's hitting card number 1 is used by the worst hitting pitchers. If you are using the designated hitter rule, any player may he used as a DH in place of the pitcher.
Abbreviations found on both the batter's and pitcher's cards:
FLY - Flyball
GB - Groundball
LO - Lineout
LO-Max - Lineout into as many outs as possible POP - Pop Out
HBP - Hit by pitch
SI - Single
DO - Double
TR - Triple
HR - Homerun
E(1) - Error batter safe at first, runners advance I base
E(2) - Error batter is safe at second, runners advance 2 bases
E(3) - Error batter is safe at third, all runners score
** - Runner advance 2 bases
*** - Runners advance 3 bases
& - followed by
PB - Passed Ball
++ - + (effects plays with fielder's playing in)
W -Clutch Play
® - Ball Park Home Run
· - Pitchers Fatigue
q - Ball Park Singles
r - Ball Park Single Corrector
Some readings have 2 possible results and you must roll the 20-sided die to determine the final result of the play. For example, if you rolled a 2-8 for Juan Gonzalez you would discover the following quotation:
Homerun 1-17, Double 18-20. Roll the 20-sided die. If the die roll number falls within the range of 1 to 17, the result is a home run, if it falls within the range roll 18 to 20, it is a double.
Upon reading such a result, refer to the groundball section of the "Rules at a Glance" to the specific type (A, B, C) of the groundball in question. The results of the play will be found opposite the reading. Disregard advancement of runner if there are no runners, or if the batter is the third out in the inning. The position making the play is indicated by the abbreviations in parenthesis. The positions are abbreviated as follows:
(p)-pitcher (c)-catcher (1b)-first base (2b)-second base (3b)-third base
(ss)-shortstop (lf)-left field (cf)-centerfield (rf)-right field
Refer to the flyball section of the "Rules at a Glance" to the specific type (A, B, C) of the flyball in question and determine the result in the same manner as Groundball A, B C
The fielding ability of a defensive player is needed to determine the outcome of the play. Refer to the fielding rating of the defensive player whose position is indicated in the parenthesis. The fielding rating can be found in the upper left hand corner of the defensive player's card. Consult the Super Advanced Fielding Chart referring to the section that pertains to the fielder's position in question. The horizontal numbers (1, 2, 3, 4, 5) in the Range Section indicate the fielder's range. The vertical numbers under the column 'E RAT' indicate the players error rating. To determine the result of the play follow the instructions found in the Super-Advanced X-Chart Procedure.
Ratings
In comparing fielding ratings, consider a fielder with a Range Rating (the number immediately following the fielding position) of "1" to be excellent, "2" to be good, "3" to be average and "4" to be poor. The lower a fielder's Error Rating (the number following the "e") the more sure handed the player is and the less errors he will commit.
As an example, say you have two players rated at second base. The first player is rated 2b-l e34, and the second player is rated 2b-3 e5. The first player will show greater range than the second player by turning more possible hits into outs. The second player will commit fewer errors.
In addition, outfielders are rated for their throwing. Outfielders with the most powerful arms will be rated at -5, while outfielders with the weakest arms will be rated +3 and higher. Most will be rated somewhere in between. The skill of an outfielder's throwing will affect the chance of a runner's advancement on hits and outs. (See the Advancement of Runners Section)
Catchers are rated for throwing ability, Passed Ball blocking and Throwing Error Rating (See the Stealing Section and Individual Balks, Wild Pitches and Passed Ball Section,)
Pitchers are rated for Hold and Balk, Wild Pitch.
Super-Advanced X-Chart Procedure
Always roll the 20-sided die first and read the SYMBOL from the RANGE SECTION of the X-CHART using the 20-sided die roll and the fielder's defensive rating. Then ALWAYS roll the 3 dice. TOTALING ALL 3 DICE refer to the ERROR SECTION of the X-CHART using the defensive players e-rating. Cross reference the results found in the SYMBOLS CHART to determine the result of the play. IF THREE DICE ROLL FOR THE ERROR SECTION DOES NOT GENERATE A SYMBOL USE "NO" AS THE, SYMBOL.
As an example, say that a reading of GB (1B)X comes up and the first baseman is rated as a lb-4el 5. Let us say you rolled a five on the 20-sided dice. Referring to the RANGE SECTION of the SUPER-ADVANCED X-CHART, the SYMBOL under column 4 with a 20-sided roll of 5 is "SI1". Now total the 3 dice. Let us say the three dice were 6, 5 and 1. The total of these three dice is 12. Now in the ERROR SECTION of the SUPER-ADVANCED X-CHART for the first baseman look at the row for a 15 E-RAT. The SYMBOL to use is "E1" since the sum of the dice (12) falls under the column headed "El". Now to get the result of the play, refer to the SYMBOLS CHART of the SUPER-ADVANCED FIELDING CHART and look-up the "SI1" symbol section. Within this section look at the play result next to the "E1" symbol for the final result of the play. In this example, the result of the play is a single PLUS an error.The batter would go to second and ALL nunners would advance 2 bases.
NOTE: If a "PO" rare play occurs with runners on first and second or bases loaded and less-than two out, consider this an infield fly rule - the batter is out and the runners hold. Otherwise accept this play a single.
One asterisk (*) following a single indicates an automatic one base advance for all runners, Two asterisks (**) following a single or double indicates an automatic two base advance for all runners. Singles not followed by an asterisk(s) shall be considered a 1 base advance; doubles not followed by asterisks shall be considered a 2 base advance. However, in instances of singles and doubles not followed by asterisk(s), the manager of the team at bat may elect to have his baserunners advance an additional base. This does not include the batter who remains on the base indicated by the hit (first base for a single, second base for a double). If the manager decides to try for the extra base, he refers to the leading baserunner's running rating, found at the upper right-hand comer of his batting card and then adds 'Modifications for runner advancement'. This would give you the runners chance for advancement. The defensive manager would then roll the 20-sided die. If the number rolled falls on or under the runner's chance for advancement, all runners advance an additional base.
The possible changes to a batter's baserunning rating are as follows:
The combined running rating with all possible modifications cannot be lower than 1 nor higher than 19.
Cut-Off Rule with Throw to Home
When a runner has the option to score a run on a throw from the outfield, the CUT-OFF rule may be invoked. This can occur with a reading of SINGLE (with no stars), DOUBLE (with no stars) or flyB? (with a runner on third and at least one other runner on base).
The rule is applied as follows (note, that in the following rules, the batter is considered a 'trail runner' except on a reading of fly( )B?):
6. If the offensive manager has decided to send the runner home AND to let the trail runner(s) move up a base, then the defensive manager must take one o the following options:
Batter Advancement on Throw to Third
When a runner has the option of going from first to third on a single (with no stars) then use the following rule:
When a batter becomes a baserunner or if there is an on base change (ex: runner on first, batter grounds into a forceout), the defensive manager IMMEDIATELY indicates whether the lead runner is to be held on . The defensive manager must elect to either hold or not hold the runner before every at bat. For example, with a runner at first base, the defense may indicate that a runner will be held on. After the next batter strikes out, he may decide not to hold the runner on. Of course, once the runner(s) relinquishes their base(s), the defensive manager's holding on instructions are automatically voided.
Stealing Second Base
Stealing second base is achieved by tolling two 6-sided dice and one 20-sided die and referring to the set of supplementary stealing numbers located at the top of the player card following the advanced steal rating of the would-be basestealer and the Balk & Pickoff Rule. An example of possible supplementary stealing system numbers may be found below.
*8-10/11,12 (19-14)
After the offense declares his intention to steal, he would first roll all three dice (One 20-sided and two 6-sided) If a roll of 3-20 on the 20-sided die occurs continue with the normal steal sequence (re-rolling the 20-sided die if a steal is actually attempted). If a 1 or 2 is rolled on the 20-sided die you would refer to the Balk/Pickoff Rule (see below).
The set of numbers (numbers preceding slash) indicate a player's chance of establishing a good lead. The second set of numbers (numbers following slash and before parenthesis) pertain to the runner's out stealing range. The third set of numbers (number in parenthesis) are the player's steal rating numbers. If the dice roll results fall within the first set of numbers, in the example 8-10 (8,9 or 10), the runner has established a good lead and MUST steal. If the dice roll result falls within the second set of numbers (in the example, 11 or 12) the runner is automatically out stealing. If the dice roll value is not included in either the first two sets of numbers (good lead numbers or out stealing numbers), 2-7 in the example, the baserunner has failed to establish a good lead and this is not a MUST attempt steal situation.
If the baserunner established a good lead, the defense decides whether to contest the stolen base, If the defense decides not to contest the stolen base, the base is stolen and no other action is needed. If the defense decides to attempt to throw the runner out, roll the 20-sided die and refer to the first rating in parenthesis (in the example, 19) found on the baserunner's card. If the roll is between 1 and 19 the baserunner successfully stole second base. If the roll is 20, he was thrown out attempting to steal.
If the baserunner failed to establish a good lead, the offensive manager may reverse his decision and not steal, However, if the manager still prefers a steal attempt, refer to the second rating number in parenthesis, in this example 14. If the 20-die roll is from 1 to 14 the runner is safe. If the roll is 15-20, the runner is out stealing,
When using either rating number, first add together the catcher's throwing arm rating and the pitcher's hold rating (found at the top of the pitcher's card), The total of the two numbers must not exceed the range of -5 to +5. For example, if the catcher's throwing rating was -3 and the pitcher's hold rating was -4, the total of -7 would be reduced to -5 . However, if the runner is "held on" subtract from the prior total the following, an additional -2 when using the first rating and -4 when using the second rating number. THIS NUMBER MAY NOT EXCEED -5. In order to demonstrate the entire calculation assume the following: the runner being held on, assume a catcher's throwing arm rating of -4 and a pitcher's hold rating of -3. If the dice roll total was 8 (two six-sided dice), the baserunner established a good lead and must steal. First total together the catcher' a throwing arm rating (-4) and the pitcher's hold rating (-3). Since (-7) is greater than the maximum deduction , reduce to (-5). Then subtract (-2). His chances for a successful steal would be 1-12 [19 + (-5) + (-2) = 12], If the initial dice roll was 5, the baserunner did not get a good lead. If the offensive manager still wanted to attempt a steal of second, his chances would be 1-5 [14 + (-5) + (-4)=5]. IF THE BASERUNNER IS NOT HELD ON, THE SAFE STEAL RATING (NUMBER IN PARENTHESIS) MAY EXCEED 20, IF A RUNNER IS HELD ON, THE MAXIMUM RANGE IS 1-19,
In a steal situation, if a baserunner's good lead numbers are preceded by an asterisk and he is not being held on, the offensive manager automatically rolls the 20-sided die referring to the baserunner's first rating number. A dice frequency roll is not necessary to establish a good lead in this situation. An asterisk reading only affects steals of second base (third and home are not affectedly
NOTE: There is only one dice roll for the lead per baserunner per base. There are two exceptions to this rule:
Catcher's T-Rating
If second or third base is successfully stolen, and 1,2 or 3 was rolled during the successful steal, roll the 20-sided die again. Refer to the defensive catcher's card for his "T" number(s). If the number rolled is within the range of the catcher's "T" number(s), a throwing error by the catcher has occurred, allowing the baserunner(s) to advance one additional base. No throwing error occurs if the number rolled is not listed among the defensive catcher's "T" number(s).
Stealing Third Base
An attempted steal of third base is slightly different. In order for the runner to steal, he must achieve a good lead, If the manager's dice roll results fail to fall within the attempt steal range of the would-be stealer, he may not attempt a steal of third base. Of course, the runner is out if the dice roll results fall within the out stealing range. If the baserunner achieved a good lead, roll the 20-sided die and refer to the SECOND rating number (14 in the example) of the potential stealer. Deduct -4 if the defensive manager had indicated that he was "holding the runner on", also take into account the catcher's throwing arm and the pitcher's hold rating,
Stealing Home
An attempted steal of home is exactly the same as stealing third base with two exceptions: Subtract -9 from the baserunner's second rating and do not account for the catcher's throwing arm and the pitcher's hold rating. For example, if the baserunner on third is NOT held on, his safe chances are 1-5 [ 14 + (-9) = 5]. If he had been held on his only chance for a successful steal of home would be 1 [14 + (-9) + (-4) = 1]
Delayed Steal of Home
With runners on first and third the offensive manager may call for a "delayed steal" of home. When using a delayed steal you do not roll for the lead. First calculate the safe range for the runner on first by using his second steal rating number in parenthesis and adding in the catcher's arm (do not adjust for the pitcher's hold rating or the fact that he is held on base). The defensive manager must now choose to either have the catcher hold onto the ball (this prevents the runner on third from attempting to steal home) or throwing to second in an attempt to get the runner. If he chooses to hold onto the ball then credit the runner going to second with a stolen base and resume play.
If he chooses to throw to second then the runner on third may attempt to steal home without having to roll for the lead. Calculate the safe range for the runner on third by subtracting 5 off of his second number in parenthesis (do not adjust for the pitcher's hold rating, the catcher's throwing arm or the fact that he is held on base).
If the runner on third attempts the steal of home the defensive manager can then either cut-off the ball and throw home or try for the out at second base. Note that with 2 outs if the defensive throws and gets the runner going to second base then the runner on third does not score.
This strategy may not be used if the offense has already rolled for the lead for either baserunner.
Double Steal
In a double steal, only the lead runner is involved. The other runner(s) automatically advance one base.
Holding a Runner on Base
When holding a runner on base, refer to the following chart to determine which fielder(s) are responsible for holding the runner on base. The penalty for holding a runner on is as follows: If a gb( )X is hit to a fielder who is responsible for holding a runner on base, add 1 to that fielder's range rating when consulting SUPER ADVANCED FIELDING CHART. For example, with a runner on 1st being held and a left-handed batter up, a gb(ss)X reading occurs. Let's say the shortstop is rated ss-2 e2O. When consulting the fielding chart you should treat him as a ss-3 e2O. Note that if a player is already a 5 do not add 1 to his rating as 5 represents the maximum rating. In addition, when consulting the fielding chart for this fielder, all readings followed by the # symbol are treated as "SI2".
|
Runner being Held |
Fielder responsible for holding runner on |
|
Runner on 1st, left-handed batter |
1B & SS |
|
Runner on 1st, right-handed batter |
1B & 2B |
|
Runner on 2nd, left-handed batter |
SS |
|
Runner on 2nd, right-handed batter |
2B |
|
Runner on 3rd |
3B |
Balk/Pickoff Rule
If a dice roll of 1 or 2 is rolled on the 20-sided die, during a steal attempt the pitcher has attempted a pickoff throw and the base runner dives back to the base.
A roll of 1 on the 20-sided die indicates that the baserunner attempting the lead may be picked-off. Refer to the baserunner's second steal rating number in parenthesis and roll the 20-sided die again. If the number rolled is less than or equal to the second steal rating the baserunner dives back safely (the steal attempt is canceled and the runner may not attempt to get the good lead again while still on this base). If the number is greater than the second steal rating then this baserunner is picked off.
A roll of 2 on the 20-sided die indicates a possible balk. Roll the 20-sided die again and refer to the pitcher's balk rating, If the number rolled is less than or equal to the balk rating then a balk has occurred and all baserunners advance 1 base. If the number is higher than the pitcher's balk rating then the baserunner dives back safely (the steal attempt is canceled and the runner may not attempt to get the lead again while still on this base).
NOTE: At first at base, if the runner dives back safely, he may still steal using his second steal rating number. At second base, if the runner dives back safely, be may NOT steal.
Bunting and hit an run ratings may be found it the top of each player's card. Before the manager of the team at bat indicates his choice of strategy (bunt, hit and run or hit away), the defensive manager must state the positioning of the infield. The infield is automatically playing back when it fails to indicate positioning. Playing the infield in will affect all strategy moves found on the Super Advanced Strategy Chart.
Bunting
If a manager elects to bunt, he must announce the strategy after determining the position of the defense. As the dice are rolled the offensive manager will announce that he is bunting, The offensive manager must find the player's bunting rating which can he found at the top right-hand comer of the batter's card. The outcome of the play is resolved by utilizing the Sacrifice Bunt Chart (which can be found on the Super Advanced Miscellaneous Chart) and cross referencing the dice roll and the player's bunting rating. Be sure to take into account all pertinent details concerning the plays
Sacrifice Bunt with Runners on 1st and 3rd
You can attempt to sacrifice the runner from 1st to 2nd while holding the runner at 3rd by simply declaring your intention. In all instances, the runner on 3rd would remain there. Simply use the sacrifice as you would with the runner on first and follow the results. If the reading of "batter beats out bunt" occurs the batter is safe, runner on 1st goes to second and runner on 3rd holds. If the reading "batter pops out (c) into a double play" occurs, the runner on 1st is doubled-up and the runner on 3rd holds.
NOTE: No hit and run is allowed after a reading of "1AND2" occurs when attempting to bunt.
Hit and Run Play
The offensive manager announces that he is going to hit and run. He then proceeds to roll 3 dice. If the single-die is 1, 2, or 3 then he refers to the Super Advanced Hit and Run Chart (which is found on the Super Advanced Miscellaneous Charts page) using the batter's H&R rating. If the single-die is 4, 5 or 6, he reads the result directly off the pitcher's card in the usual manner. However, if a strikeout, walk, single or double result occurs while reading the pitcher's card disregard that reading and refer to the Super Advanced Pitching Results H&R Adjustments (also found on the Super Advanced Miscellaneous Charts page) for the final result of the play. DO NOT ADJUST ANY RESULTS OBTAINED FROM THE SUPER ADVANCED FIELDING CHART.
NOTE: No hit and run is allowed after a reading of 1AND2 occurs when attempting to bunt.
If a manager elects to hit and run, before attempting a "straight steal", he rolls two dice and refers to the hit and run chart in normal fashion. If the hit and run reading results in a missed pitch, THE BASERUNNER(S) MUST ATTEMPT A STEAL. The offensive manager rolls two dice to determine whether the lead runner had achieved a good lead. If the dice roll results indicate a good lead, the manager rolls a 20-sided die and refers to the lead baserunner's first rating, If the dice reading falls within the lead runner's out stealing range, the lead runner is out stealing, other runners advance one base. If the dice roll reading fails to indicate a good lead for the lead runner, refer to his second rating, with a roll of a 20-sided die. If the lead baserunner is on second and he fails to obtain a good lead, he is automatically out trying to steal third base. As in a typical steal situation, apply all adjustments.
With a runner on first, if a manager elects to hit and run after attempting a steal and not obtaining a good lead, refer to the second rating and apply all adjustments. If the lead baserunner was on second base, he is automatically out.
Whenever there is at least one runner on base you should use the following rule: When rolling the three dice to read the results off of the players cards (or when using the hit and run chart) you should roll a 20-sided die along with the three dice. If a 3 to 20 is rolled , continue on with the normal reading of the three dice (if a split reading occurs you MUST re-roll the 20-sided die) If a 1 or 2 is rolled then the normal reading of the other dice is canceled and a wild pitch, balk or passed ball may occur.
A roll of 1 on the 20-sided die indicates that a wild pitch may occur. Roll the 20-sided die again and refer to the pitcher's wild pitch rating. If the number rolled is less than or equal to the pitcher's wild pitch rating then a wild pitch occurs and all base runners advance 1 base.
A roll of 2 on the 20-sided die indicates that either a balk or a passed ball may occur, Refer to the single white die and if it reads 1 to 3 a balk may occur, If it reads a 4 to 6 a passed ball may occur. In either case roll the 20-sided die again and refer to the appropriate rating (the pitcher's balk rating or the catcher's passed ball rating). If the number rolled is less than or equal to the appropriate rating then a balk or passed ball has occurred and all base runners advance 1 base.
|
Runners |
fly( )A |
fly( )B |
fly( )B? |
fly( )C |
|
no runners on |
batter out |
batter out |
batter out |
batter out |
|
1st |
batter out, runner advances |
batter out, runner holds |
batter out, runner holds |
batter out, runner holds |
|
2nd |
batter out, runner advances one base |
batter out, runner holds |
batter out, runner holds |
batter out, runner holds |
|
3rd |
batter out, runner advances one base |
batter out, runner scores |
batter out, runner on 3rd may attempt to score as provided in the ADVANCEMENT OF RUNNERS section |
batter out, runner holds |
|
1st & 2nd |
batter out, runners advances one base |
batter out, runners hold |
batter out, runners holds |
batter out, runners hold |
|
1st & 3rd |
batter out, runners advances one base |
batter out, runner on 3rd scores, other runner holds |
batter out, runner on 3rd may attempt to score as provided in the ADVANCEMENT OF RUNNERS section, other runner as per Cut Off Play |
batter out, runners hold |
|
2nd & 3rd |
batter out, runners advances one base |
batter out, runner on 3rd scores, other runner holds |
batter out, runner on 3rd may attempt to score as provided in the ADVANCEMENT OF RUNNERS section, other runner as per Cut Off Play |
batter out, runners hold |
|
bases loaded |
batter out, runners advances one base |
batter out, runner on 3rd scores, other runners hold |
batter out, runner on 3rd may attempt to score as provided in the ADVANCEMENT OF RUNNERS section, other runners as per Cut Off Play |
batter out, runners hold |
Ball Park Homerun with Right Fielder Making Play with Runner on Second Base
With a ball park homerun reading that is caught in right field for an out, with a man on 2nd but no man on 3rd, roll the 20-sided die. If the number is less than or equal to the baserunner's running rating plus/minus the right fielder's arm rating, the runner on 2nd automatically advances to 3rd.
LO( )max
When a reading of LO( )max occurs in a situation where a triple play would occur, roll the 20-sided die and refer to the following to determine the outcome of the play:
1-7 LINEOUT - TRIPLE PLAY!
8-20 Lineout double play - lead runner doubled off.
"Groundballs" and "Infield In" Charts
The Super Advanced Rules related to ground balls found on the batter and pitcher cards are consolidated in the following charts for easy reference. These charts refer to only the readings of gb( ) A, gb( )B and gb( )C – not to the gb ( )X which is described on the Super Advanced Fielding Chart.
If a groundball is hit to the picher with a runner on third base then ALWAYS refer to the INFIELD IN section. With no runner on 3rd ALWAYS refer to the INFIELD BACK section for results of a groundball to the pitcher.
With the CORNERS IN refer to the INFIELD BACK section except when there is a runner on third base and the ball is hit to the 1st baseman or the 3rd baseman - in that case refer to the INFIELD IN section.
Don't forget to award a single** to any groundball followed by a + with the INFIELD IN (this means the entire infield must be positioned in - if only the CORNERS are in do not award a single even if the ball is hit to 1st or 3rd).
|
Runners |
gbA |
gbB |
gbC |
|
3rd |
runner on 3rd holds, batter out at 1st |
runner on 3rd out at home, batter safe at first, other runners advance one baset |
runner on 3rd holds, batter out at 1st |
|
1st & 3rd |
runner on 3rd holds, runner on 1st to 2nd, batter out at 1st |
runner on 3rd out at home, batter safe at first, other runners advance one baset |
runner on 3rd holds, runner on 1st to 2nd, batter out at 1st |
|
2nd & 3rd |
runner on 3rd holds, batter out at 1st |
runner on 3rd out at home, batter safe at first, other runners advance one baset |
runner on 3rd holds, batter out at 1st |
|
bases loaded |
runner on 3rd out at home, batter safe at first, other runners advance one baset |
runner on 3rd out at home, batter safe at first, other runners advance one baset |
runner on 3rd out at home, batter safe at first, other runners advance one baset |
When a reading of "P/P" or "P/F" is generated from the SYMBOLS CHART you should use the following procedure to determine if a passed ball occurs:
Refer to the pitcher's WP rating on his card, Roll the 20-sided die and if the roll is less than or equal to the pitcher's WP rating then a passed ball has occurred. If the roll is greater than the pitcher's WP rating then the catcher blocks the pitch, runner hold.
On an F2 from the Super Advanced Fielding Chart with runners on 2nd and 3rd, do not subtract (-5) from the running rating of the men on 2nd base as this is not a cut-off play. However, do make the appropriate adjustment for throws to 3rd (the adjustment for the OF's position making the play). Also, on this reading when there is a runner on 2nd but not runner on 3rd the runner on second CAN try to tag up and advance to third.
A pitcher's endurance factor inning indicates a specific inning in which a pitcher's effectiveness may be reduced drastically or a point of weakness my occur His endurance factor inning may be found at the top of his card directly after the words starter and relief. If a pitcher starts and relieves, he will have two endurance factor innings. In addition, some players rated as relievers will also have an endurance for "closing situations" (see CLOSER RULE.)
Please note that all pitcher cards contain out readings followed by a dot (·). An example may be found in 6-5 of Tom Glavine's pitching card. Let us assume that an out reading followed by a dot is rolled. The following procedure is applied: If a pitcher has reached his POW, ignore the out reading and substitute verbally the phase single**. If a pitcher has not reached his POW, the out reading is the correct result. It is strongly suggested that you relieve a pitcher who has reached his POW.
There are four ways for a starting pitcher to reach his POW:
|
Runners |
gbA |
gbB |
gbC |
|
no runners on |
batter out at 1st |
batter out at 1st |
batter out at 1st |
|
1st |
runner out at 2nd, batter out at 1st |
runner forced at 2nd, batter safe at 1st on fielder's choice |
runner advances one base, batter out at 1st |
|
2nd |
on ball hit to SS or 3B - runner holds, batter out at 1st, on ball hit to 2B or 1B, runner to 3rd batter out at 1st |
on ball hit to SS or 3B - runner holds, batter out at 1st, on ball hit to 2B or 1B, runner to 3rd batter out at 1st |
runner advances one base, batter out at 1st |
|
3rd |
on ball hit to SS or 2B - runner scores (if less than two outs), batter out at 1st, on ball hit to 3B or 1B, runner holds, batter out at 1st |
on ball hit to SS or 2B - runner scores (if less than two outs), batter out at 1st, on ball hit to 3B or 1B, runner holds, batter out at 1st |
runner advances one base, batter out at 1st |
|
1st & 2nd |
runner on 2nd to 3rd, runner on 1st out at 2nd, batter out at 1st |
roll one 6 sided die a roll of 1 or 2, runner on 2nd forced at third, runner on 1st to 2nd, batter safe at 1st a roll of 3-6 runner on 2nd to 3rd, runner on 1st out at 2nd, batter safe at 1st |
all runners advance one base, batter out at 1st |
|
1st & 3rd |
runner on 3rd scores, runner on 1st out at 2nd, batter out at 1st |
runner on 3rd scores, runner on 1st out at 2nd, batter safe at 1st |
all runners advance one base, batter out at 1st |
|
2nd & 3rd |
On ball hit to SS - runner scores (if less that two outs), runner on 2nd holds, batter out On ball hit to 2B - runner scores, runner on 2nd to 3rd, batter out at 1st On ball hit to 1B or 3B - runners hold, batter out at 1st |
On ball hit to SS - runner scores (if less that two outs), runner on 2nd holds, batter out On ball hit to 2B - runner scores, runner on 2nd to 3rd, batter out at 1st On ball hit to 1B or 3B - runners hold, batter out at 1st |
all runners advance one base, batter out at 1st |
|
bases loaded |
runner on 2nd and 3rd advance one base, runner on 1st forced at 2nd, batter out at 1st |
runners on 2nd and 3rd advance one base, runner on 1st out at 2nd, batter safe at 1st |
all runners advance one base, batter out at 1st |
For example, a pitcher with an endurance rating an endurance factor of 6 allows 3 hits to the first 3 batters in the sixth inning, his POW begins with the fourth batter of the inning.
|
Endurance Factor |
Maximum IP |
|
1 |
3 |
|
2 |
4 |
|
3 |
5 |
|
4 |
6 |
A relief pitcher's POW is determined by outs. Here are the relief pitchers endurance factors with the corresponding number of outs.
A relief pitcher has reached his POW as soon as he meets the following conditions:
Please note that hits and walks allowed by a pitcher through all innings preceding his endurance factor innings/outs do not contribute toward his POW. For example, all hits and walks through the fifth inning do not contribute toward a POW for a pitcher with an endurance factor inning of 6.
Count all hits and walks. Batters who subsequently are erased on the bases (PO,CS etc.) ARE COUNTED.
Once a pitcher has reached his POW, it cannot be overcome. Any out readings followed by a · become hits, regardless of how well he pitches after reaching his POW.
Example: When computing a relief pitcher's POW, count outs instead of innings. A pitcher with an endurance rating of 1 enters the game with 2 outs in the 7th inning. According to the rules, he is eligible to reach his POW as soon as he allows 3 hits or walks in one inning or less or 4 hits and/or walks in a span of 2 innings or less. Say he allows a base hit and then gets the last out of the 7th inning. Then he starts the 8th inning by retiring one batter. Then he allows 2 hits. At this point lie has reached his POW as he has allowed 3 hits in less than 1 inning.
Closer Rule
Each reliever is given a second rating next to his Relief Endurance rating which we will refer to as his "Closer Endurance". For example, a pitcher who is rated "relief (2/3) has a Relief Endurance of 2 and a Closer Endurance of 3. The Closer Endurance rating is a measure of how many outs a pitcher can maintain his effectiveness in "Closer situations". The rating ranges between 0 and 6, or "N" which means he is not used as a closer.
A "closer situation" occurs whenever the defensive team has the lead and the tying run is at-bat or on-base from the 9th inning on. When this situation occurs then observe the following rule changes:
When bringing a relief pitcher into the game in a closer situation ignore his Relief Endurance rating. Instead use his Closer Endurance rating to determine the number of outs he can record before he loses his effectiveness.
Once this number of outs have been recorded, the pitcher will lose his effectiveness as soon as he allows a hit or a walk. If a pitcher is rated 0, then he loses his effectiveness as soon as he allows a hit or a walk. When a pitcher loses his effectiveness, he has reached his POW.
If the pitcher being brought into the game in a closer situation has a Closer Endurance rating of "N", then he enters the game with the loss effectiveness penalty already in affect (he has reached his POW). For pitchers rated as a "N", this penalty is always in effect starting with the first batter they face in a closer situation.
If the pitcher in the game has a Closer Endurance rating of "N", then he immediately loses his effectiveness (he reaches his POW.)
If the pitcher in the game has a Closer Endurance rating of 0 to 6, you should subtract the number of outs that he has already recorded in this game from his closer rating. This number becomes his Closer Endurance for this game. If the computed number is less than 0, then accept 0 as his Closer Endurance for this game.
Follow the rules outlined above (under "Reliever being brought into the game") using this computed Closer Endurance instead of his actual rating.
Table 6: Relief Pitcher's Maximum Innings
|
Endurance Factor |
Maximum IP |
|
1 |
3 |
|
2 |
4 |
|
3 |
5 |
|
4 |
6 |
Relief pitchers cannot be used more than 2 straight days. He must rest at least 1 day after pitching 2 straight days. If the pitcher was used as a starter in his previous outing then before he can be used as a reliever he must rest the amount of days specified in the SUPER-ADVANCED STARTING PITCHERS REST CHART. If a pitcher who does not have a rating as a relief pitcher must pitch in relief, give him an endurance rating of 1.
Ignore all readings that have a q to the left of it. Instead, read the results found underneath the q symbol of the ball park effects card. To obtain results, refer to the appropriate home stadium and the batting stance (L = lefty or R = righty) of the hitter. Most likely, you will roll a twenty-sided die to determine the final outcome.
Ignore all readings that have a r to the left of it. Instead, refer to the second reading (in italics) under the number.
Ignore all readings that have a ¿ to the left of it, Instead, read the results found underneath the ¿ symbol of the ball park effects card. To obtain results, refer to the appropriate home stadium and the batting stance (L = lefty, R = righty) of the hitter. Player's with weak power (W, see 'Power Rating' in the Miscellaneous Rules section below) may not hit homeruns. In this situation, change all homerun results to single** (You resolve the play in the normal manner. If the result is a flyball(of)B, the result is the same. However, if the play results in a Homerun verbally substitute single** for any player with weak power.)
Occurs only in two-out situations in which one or more runners in scoring position (occupying second and/or third base.) When such a situation exists, and a reading is rolled that has a W symbol to the left of it, the results of the reading are reversed in the following manner: If the reading in any type of an out, automatically reverse it to a SINGLE**; if the reading results in a single automatically reverse it to a popout.
Bringing the Outfield In at the End of the Game
You may position the outfield IN at the end of the game when the winning run is on third with less than 2 outs. When the outfield is positioned IN make the following adjustments.
In an emergency, you may bring a player who is playing a regular defensive position in to pitch. Assign the following ratings: Defense - 5e51; hold -(+ 9); Relief Endurance - 1; Balk and Wild Pitch - 20. Use the Emergency Pitcher Card
Playing a Defensive Player Out of Position
You should use your discretion about using a player out of position.
If a manager uses a player at a position not listed on his card then that player is considered a 4 or 5 fielding rating, depending on whether he ever played that position. In addition, he should be given the worst possible E rating. He should be given a +5 throwing rating if he goes to the outfield or catcher. In addition, if a player is going to catcher , give him a T-rating of 1-20 and a PB rating of 1-20. The exceptions to this rule are outfielders who may play art outfield position they are not rated for by using the following adjustments to their defensive rating (do not change their e-rating or arm):
|
Position not rated for |
|||
|
position rated for |
CF |
RF |
LF |
|
CF |
N/A |
0 |
0 |
|
RF |
+1 |
N/A |
0 |
|
LF |
+2 |
+1 |
N/A |
Please note that all homerun readings found on the pitcher's card are preceded by the letter N. An example may be found in 6-9 of Tom Glavine's pitching card. If a batter's power rating is N, the homerun reading remains unchanged. However, if a batter's power rating is W, substitute verbally the phrase single** for homerun. For example, if a 6-9 is rolled and Glavine is facing a W (weak) rated batter, the reading would change to "SI** 1-3, DO 4-20". A batter's power rating may be found at the top of his card. Please note that some batters' power ratings vary against right- and left- handed pitching.
Stealing on Turf
Whenever a steal is attempted on Artificial Turf add +1 to the steal rating numbers after the all other modifications have been made (the minimum / maximums still apply.)
Pitcher Rest
Table 7: Relief Pitcher's Rest Chart
|
Short Reliever (1 or 2) |
Long Reliever (3 or 4) |
||
|
IP |
Rest |
IP |
Rest |
|
0-1 |
0** |
0-2 |
0* |
|
1.1-2 |
0* |
2.1-3 |
1 |
|
2.1-3 |
1 |
3.1-4 |
2 |
|
3.1-4 |
2 |
4.1-5 |
3 |
|
5.1or more |
4 |
||
Relief pitchers rest will be governed by the "Relief Pitcher's Rest Chart". In addition, a pitcher used in relief in his last outing should have at least 1 day of rest before starting. If he does not have this day of rest then consider him fatigued for that entire start. If a pitcher who does not have a rating as a relief pitcher must pitch in relief, give him an endurance rating of 3.
Groundballs to pitcher with runner on 3rd
With no runner on 3rd ALWAYS refer to the INFIELD BACK section for results of a groundball to the pitcher. With a runner on 3rd refer to the following rules:
|
Runners |
gbA |
gbB |
gbC |
|
3rd |
runner on 3rd holds, batter out at 1st |
runner on 3rd holds, batter out at 1st |
see DECIDE (subtracting 8 instead of 4) on the Super-Advanced Groundball Results Chart |
|
1st & 3rd |
runner on 3rd holds, runner on 1st to 2nd, batter out at 1st |
see DECIDE (subtracting 8 instead of 4) on the Super-Advanced Groundball Results Chart |
see DECIDE (subtracting 8 instead of 4) on the Super-Advanced Groundball Results Chart |
|
2nd & 3rd |
runners hold, batter out |
see DECIDE (subtracting 8 instead of 4) on the Super-Advanced Groundball Results Chart |
see DECIDE on Super-Advanced Groundball Results Chart |
|
bases loaded |
runner on 3rd forced at home, runner on 1st and 2nd advance one base, batter out at 1st |
runner on 3rd forced at home, other runners advance one base, batter safe at 1st |
runner on 3rd forced at home, other runners advance one base, batter safe at 1st |
|
Runners |
gbA |
gbB |
gbC |
|
no runners on |
batter out at 1st |
batter out at 1st |
batter out at 1st |
|
1st |
runner out at 2nd, batter out at 1st |
runner forced at 2nd, batter safe at 1st on fielder's choice |
runner advances one base, batter out at 1st |
|
2nd |
on ball hit to SS or 3B - runner holds, batter out at 1st, on ball hit to 2B or 1B, runner to 3rd batter out at 1st |
on ball hit to SS or 3B - runner holds, batter out at 1st, on ball hit to 2B or 1B, runner to 3rd batter out at 1st |
runner advances one base, batter out at 1st |
|
3rd |
on ball hit to SS or 2B - runner scores (if less than two outs), batter out at 1st, on ball hit to 3B or 1B, runner holds, batter out at 1st |
on ball hit to SS or 2B - runner scores (if less than two outs), batter out at 1st, on ball hit to 3B or 1B, runner holds, batter out at 1st |
runner advances one base, batter out at 1st |
|
1st & 2nd |
runner on 2nd to 3rd, runner on 1st out at 2nd, batter out at 1st |
roll one 6 sided die a roll of 1 or 2, runner on 2nd forced at third, runner on 1st to 2nd, batter safe at 1st a roll of 3-6 runner on 2nd to 3rd, runner on 1st out at 2nd, batter safe at 1st |
all runners advance one base, batter out at 1st |
|
1st & 3rd |
runner on 3rd scores, runner on 1st out at 2nd, batter out at 1st |
runner on 3rd scores, runner on 1st out at 2nd, batter safe at 1st |
all runners advance one base, batter out at 1st |
|
2nd & 3rd |
On ball hit to SS - runner scores (if less that two outs), runner on 2nd holds, batter out On ball hit to 2B - runner scores, runner on 2nd to 3rd, batter out at 1st On ball hit to 1B or 3B - runners hold, batter out at 1st |
On ball hit to SS - runner scores (if less that two outs), runner on 2nd holds, batter out On ball hit to 2B - runner scores, runner on 2nd to 3rd, batter out at 1st On ball hit to 1B or 3B - runners hold, batter out at 1st |
all runners advance one base, batter out at 1st |
|
bases loaded |
runner on 2nd and 3rd advance one base, runner on 1st forced at 2nd, batter out at 1st |
runners on 2nd and 3rd advance one base, runner on 1st out at 2nd, batter safe at 1st |
all runners advance one base, batter out at 1st |
|
Runners |
gbA |
gbB |
gbC |
|
3rd |
runner on 3rd holds, batter out at 1st |
see DECIDE (subtracting 8 instead of 4) on the Super-Advanced Groundball Results Chart |
see DECIDE on Super-Advanced Groundball Results Chart |
|
1st & 3rd |
runner on 3rd holds, runner on 1st to 2nd, batter out at 1st |
see DECIDE (subtracting 8 instead of 4) on the Super-Advanced Groundball Results Chart |
see DECIDE on Super-Advanced Groundball Results Chart |
|
2nd & 3rd |
runners hold, batter out |
see DECIDE (subtracting 8 instead of 4) on the Super-Advanced Groundball Results Chart |
see DECIDE on Super-Advanced Groundball Results Chart |
|
bases loaded |
runner on 3rd forced at home, runner on 1st and 2nd advance one base, batter out at 1st |
runner on 3rd forced at home, other runners advance one base, batter safe at 1st |
runner on 3rd forced at home, other runners advance one base, batter safe at 1st |
Comments or SuggestionsThanks for visiting the BasebaLL Think Factory. For information about contributing, to make a comment or suggestion, or to report a problem at my WWW site, please complete my Feedback Form. If your browser does not support forms, send e-mail to webguru@baseballstuff.com. |
|
Original material Copyright © 1996-1999
BasebaLL
Think
Factory
|
|
Back to the top of page | Baseball Think Factory | BaseballStuff.com |